
If you’re bundling up to stay warm despite hefty heating bills, the trouble may be your attic. Poorly insulated attics can lead to high utility bills and difficulty regulating your home’s temperature. By properly insulating your attic with a trusted installer such as https://atticconstruction.
This May Also Interest You: How Much Does Attic Insulation Cost?
Follow these seven steps to learn how to insulate an attic and create a more energy-efficient home:
1. Assess Your Current Insulation
Before investing in attic insulation, assess the existing insulation. By identifying its type and thickness, you can calculate its R-value, indicating its thermal resistance. Comparing this value to the Department of Energy’s recommended level for your climate helps determine if the insulation is adequate or if an upgrade is needed.
Equally important is evaluating the condition of the current insulation. Moldy, water-stained, or compressed material is ineffective and warrants replacement. For homes built before 1990, be vigilant for asbestos. Insulation exhibiting loose, lightweight, grainy texture with shiny flecks may contain vermiculite sourced from asbestos-rich deposits. If asbestos is suspected, engage a professional to conduct testing and safely handle its removal, if required.
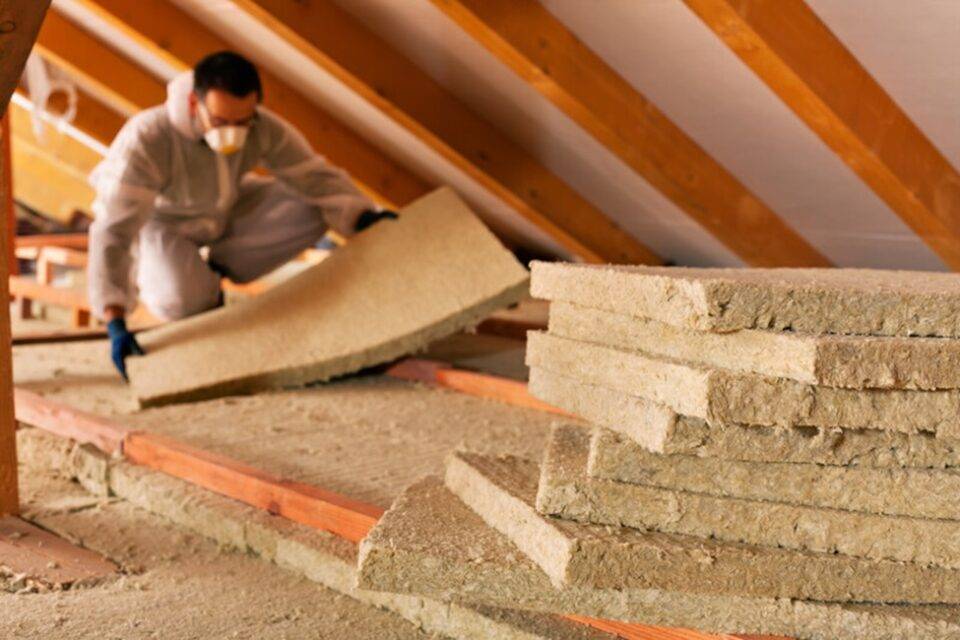
2. Choose a Type of Insulation
When selecting insulation material, consider your household’s specific needs and situational factors including:
- Soundproofing capabilities
- Fire resistance properties
- Ability to deter insects
- Vulnerability to moisture
- Budgetary constraints
Types of Insulation
Various types of insulation are accessible for attics. These comprise:
Loose Fill Insulation
Loose fill insulation, available in bags, can be swiftly and efficiently blown into place with equipment rented from home improvement centers. Composed of materials such as fiberglass, cellulose, or mineral wool, it is ideal for:
- Topping existing insulation
- Attics with obstructions, limited headroom, or poor maneuverability
- Attics featuring nonstandard or irregular joist spacing
Batt Insulation
Batt insulation is supplied in rolls, sometimes with a facing acting as a vapor barrier. It requires cutting to fit around obstacles and can be layered for desired thickness. Comprising materials like cotton, fiberglass, cellulose, or mineral wool, it is suitable for:
- Attics lacking existing insulation
- Attics with standard joist spacing
- Attics with good maneuverability and minimal obstructions
- DIY enthusiasts seeking straightforward installation
Spray Foam Insulation
Closed-cell polyurethane spray foam expands to conform to various spaces. Though typically pricier than other options, it offers superior performance as both air and vapor barriers. Resistant to mold, water, insects, and pests, it is recommended for:
- Attics with inaccessible spaces requiring tailored insulation
- Attics requiring additional structural support
- Residences plagued by rodent issues
Rigid Foam Insulation
Also known as foam boards, these panels are sold in sheets. While they boast excellent heat resistance, their rigid nature often necessitates usage alongside other insulation types. Foam boards are suitable for:
- DIY enthusiasts seeking lightweight, cost-effective insulation with easy installation.
3. Check for Rebates
Certain state energy departments provide incentives for improving home energy efficiency. Explore the Database of State Incentives for Renewables & Efficiency to discover available deals in your state. Alternatively, reach out to your utility provider to inquire about any incentives they may offer.
4. Prepare for Installation
Regardless of the chosen material, follow these steps when preparing for insulation installation:
- Measure: Determine your attic’s square footage to accurately purchase materials.
- Repair roof leaks: Address any roof leaks beforehand to prevent moisture damage to the insulation.
- Seal air leaks: Identify and seal any air leaks between the attic and exterior or living spaces. Common leak locations include windows, pipes, chimneys, ducts, and plumbing vents. Use caulking, cement, weather-stripping, or spray foam for sealing.
- Cover lighting fixtures: Prevent fire hazards by covering lighting fixtures with metal flashing, hardware cloth, or plywood, ensuring a 3-inch safety gap between insulation and fixtures.
- Wear protective gear: Shield yourself from insulation fibers by wearing a long-sleeved shirt, long pants, work gloves, goggles, and a dust mask or respirator.
- Prioritize safety: Lay temporary plywood flooring for safer footing and ensure ample illumination during installation to prioritize safety over exposed joists.
5. Install a Vapor Barrier
If your selected insulation lacks a built-in vapor barrier, you’ll have to install one separately. Position the barrier closest to the warm side of the insulation, adjusting based on your climate conditions. Ensure the sheeting fits snugly between the joists and use foil tape to seal the seams effectively and prevent moisture infiltration.
6. Start With the Attic Floor
Insulating the attic floor stands out as one of the simplest and most cost-effective methods to weatherize your attic. Begin by removing the plywood flooring, exposing the floor joists. Next, layer in new insulation over any existing material. However, a drawback is that this process eliminates attic storage space for items like seasonal decorations and less frequently used belongings.
7. Install Insulation
Always adhere to the specific instructions provided for the materials you’ve selected, and keep these straightforward tips in mind for a successful attic insulation installation:
- Begin at the outer walls and progress inward toward the access point to minimize potential damage to newly installed materials.
- Ensure you use enough insulation to achieve your target R-value, maintaining a consistent depth throughout the attic space.
- When working with loose fill insulation, block off the area to prevent material from escaping into your home, and maintain the blower parallel to the attic floor.
- When installing batts, be mindful not to compress lower layers by laying heavier materials on top.
- Neatly cut batts to fit around obstacles to prevent compression.
- Insulate entry points by attaching rigid foam insulation to the attic side of the access door and adding weather-stripping as necessary.
- If you encounter difficulties or if the installation involves electrical work near outlets or breaker boxes, prioritize safety and consider hiring a professional.
- Always adhere to local building-code regulations.